Client Reconciliation
Client reconciliation provides a means for writing off balances, clearing open activity, and
transferring balances at the client level.
To Perform a Reconciliation
- On the Primary
menu,
click ORGANIZATION.
- Select the territories
tab and select the Details
 icon next to the territory to reconcile.
- Select the accounting > transactions > reconciliation tab.
- Click [Add
New Reconciliation]. The Reconciliation dialog box is displayed.
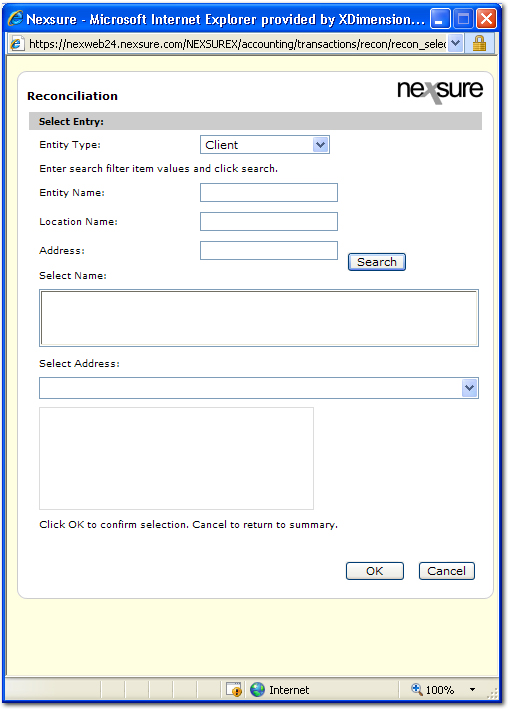
- In the Entity Type list, select Client.
- Enter at least three characters
of the name for the client and click Search.
Note:
If the
client has an alternate address, it can be selected from the Select Address list.
- Select the client in
the search results and click OK. The reconciliation tab is displayed.
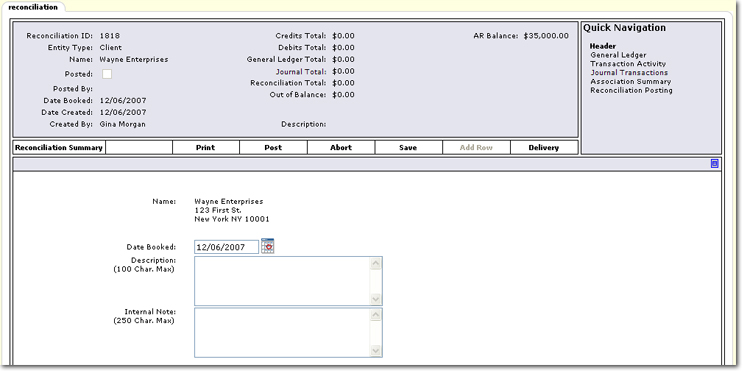
The following information is available in the  client reconciliation header:
- Reconciliation ID: Sequential number assigned by Nexsure.
- Entity Type: Defaults to Client, the entity selected when starting the reconciliation.
- Name: The client name selected during the entity search.
- Posted: Selected when the reconciliation is posted. The date of the posting will also be displayed.
- Posted By: The name of the staff member that clicked Post.
- Date Booked: The date entered in the Date Booked box when editing the reconciliation header.
- Date Created: The date the [Add New] link was clicked on the reconciliation tab.
- Created By: The name of the staff member that clicked the [Add New] link.
- Credits Total: The total of the credit items selected in Quick Navigation > Transaction Activity during the reconciliation process.
- Debits Total: The total of the debit items selected in Quick Navigation > Transaction Activity during the reconciliation process.
- General Ledger Total: The net amount of the line items entered through the Quick Navigation > General Ledger link. The offset will be completed against accounts receivable in the Client Journal Associations screen.
- Journal Total: The total amount of entries in the Journal Transactions screen.
- Reconciliation Total: Credit Total, Debit Total, General Ledger Total and Journal Total. Must equal $0.00 to enable posting of client reconciliation.
- Out of Balance: Discrepancy total where the Reconciliation Total does not equal $0.00.
- Description: The description entered in the Description box when editing the reconciliation header.
- AR Balance: Total client accounts receivable balance including future items.
The following options are available on the Navigation Toolbar:
- Reconciliation Summary: Click to return to the reconciliation tab showing the transaction list.
- Print: Creates a PDF for the client reconciliation.
- Post: Can be clicked at any time to post the reconciliation. If the balance from the reconciliation is not $0.00 a warning message will be displayed.
- Abort: Cancels any activity and deletes the reconciliation.
- Save: Can be clicked at any point to save entries.
- Add Row: Enabled in the Quick Navigation > General Ledger screens.
- Delivery: Opens the delivery tab to email or fax the reconciliation summary information.
- In the Description box, enter a description for the reconciliation.
- In the Internal Note box, enter an internal note about the reconciliation if necessary.
- On the Navigation Toolbar, click Save.
- In the Quick Navigation panel, click the General Ledger link. The General Ledger screen is displayed.
- On the Navigation Toolbar, click Add Row.
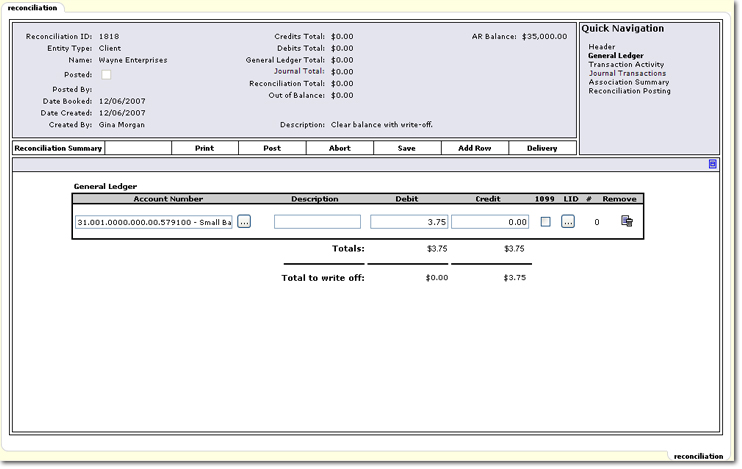
- In the Account Number column, click the Ellipsis
 button to select a general ledger number. Add as many general ledger rows as necessary, the Total to write off amount is then added to the Journal Total in the reconciliation header.
- In the Navigation Toolbar, click Save.
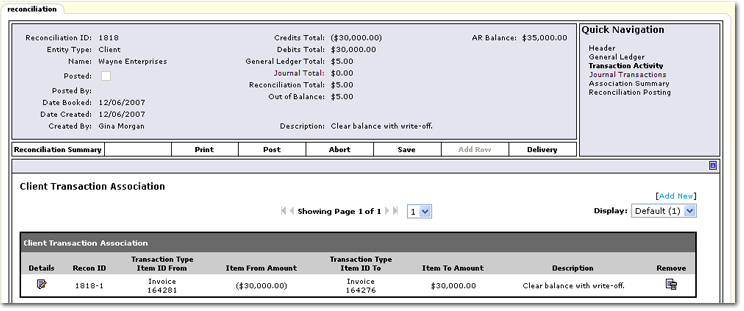
- In the Quick Navigation panel, click Transaction Activity. The Client Transaction Association screen is displayed.
- On the Client Transaction Association screen, click [Add New]. The Client Transaction View screen is displayed.
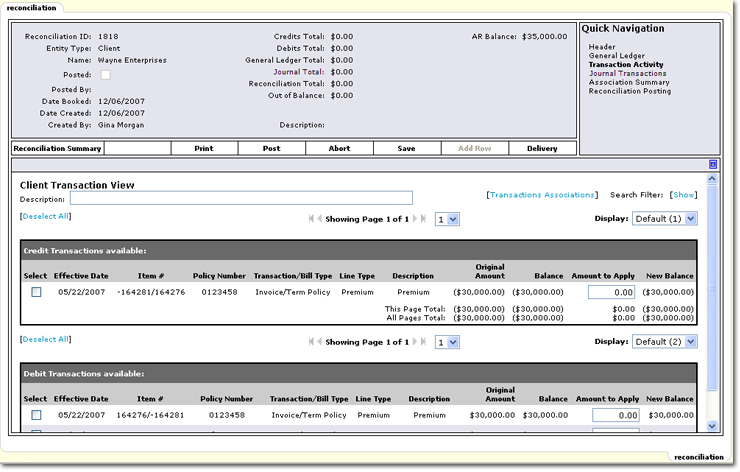
- In the Description box, enter a description for the specific application if necessary.
- Select a single Credit transaction to clear one or more Debit transactions or a single Debit to clear one or more Credit transactions. Selection of items to apply is a one to many scenario. The end result must equal $0.00.
- On the Client Transaction View screen, click [Transactions Associations]. The Client Transaction Association screen is displayed with the association line item.
- In the Quick Navigation panel, click Journal Transactions. The Journal Associations screen is displayed.
- On the Journal Associations screen, click [Add New]. The items available to write-off are displayed.
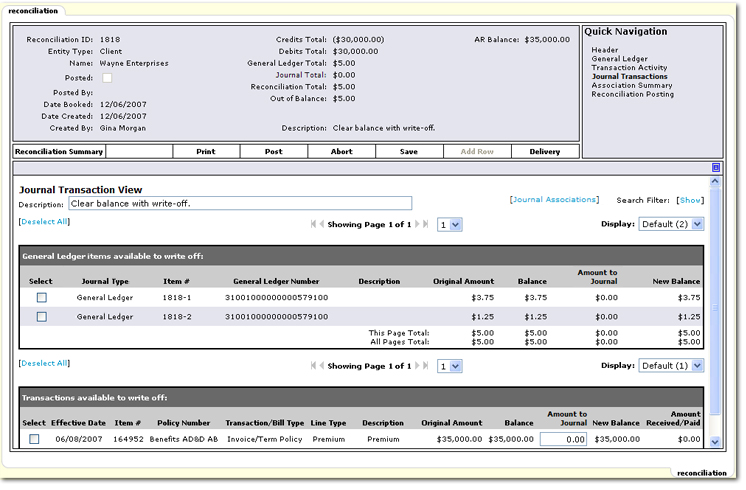
- Select one or more general ledger items to apply against a single transaction or a single general ledger item to apply against one or more transactions. Selection of items to apply is a one to many scenario. The end result must equal $0.00.
- Click Save on the Navigation Toolbar. The reconciliation header will be updated to include the amounts selected.
- On the Quick Navigation panel, click Association Summary. The Association Summary list is displayed.
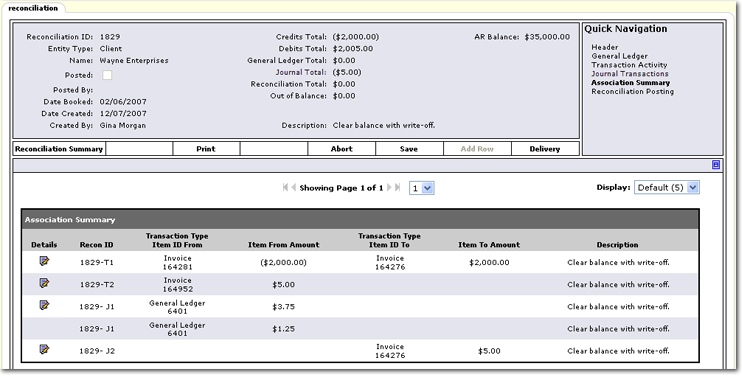
Note: Individual line items cannot be removed from the Association Summary list. To remove line items, navigate to the Transaction Activity or Journal Transactions screen.
- In the Quick Navigation panel, click Reconciliation Posting. The Reconciliation Details screen is displayed.
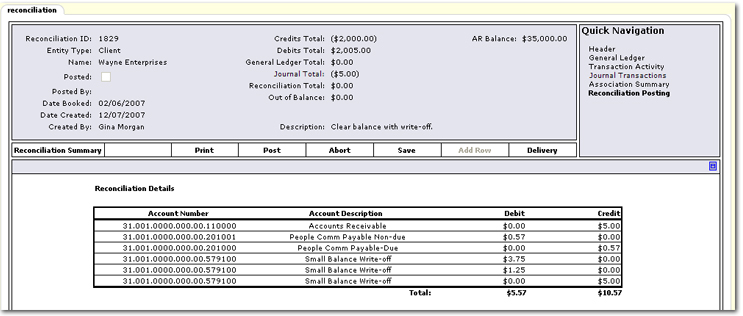
- Review the Reconciliation Details and post the reconciliation.
Reconciliation
Agency Bill Reconciliation
Direct Bill Carrier Statement Entry